
Using Custom Fonts With Snapps
Custom fonts are a great way to make your site truly unique. You can pick a font that matches your logo, a font featured on your business cards and press materials, or creative fonts that match the niche of your site. Snapps's built-in collection of fonts, along with those provided by the Google Fonts library, gives you a wide range of choices to match various site designs. If these are not enough, follow the guide below for embedding custom fonts in sites.
Disclaimer: This guide relies on a third-party tool, not one built by Snapps. Also, note that @font-face technology falls under custom code. We cannot guarantee that the font you choose supports web embedding, that the files you receive from the font foundry are ready-to-use or that the code you edit is in the correct format.
Although these issues rarely result in causing any problems with editing your site, please make sure to backup your site before you do any custom code changes. You can review our policy regarding custom code
here.
Prepare Custom Font Files
Custom fonts may come in several formats, the most popular ones being .otf, .ttf, .woff, .svg, and .eot. In order to use your font, you need to make sure you own the .ttf, .eot and .svg files.
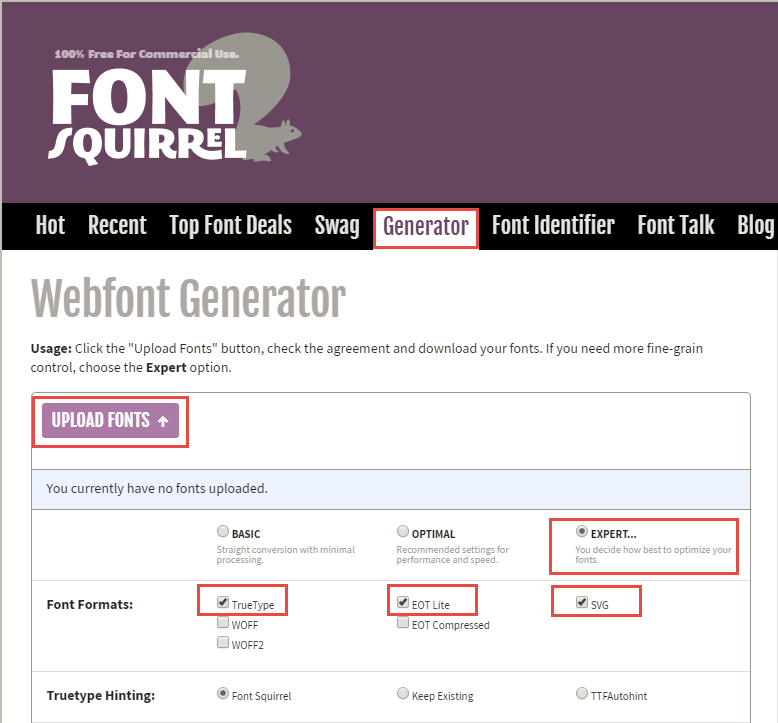
If you only have an .otf or .ttf file, we recommend using an external tool to convert the font to the required formats (in our guide below, we use FontSquirrel, but you can use any available alternatives).
Convert .otf or .ttf Files
- Download or purchase the font in .otf or .ttf format. (NOTE: The font must be licensed for the web in order for it to work.)
- Go to the FontSquirrel webfont generator tool, upload the font and convert it using the Expert option. Choose the following formats (at least): TrueType (.ttf), EOT Lite (.eot), SVG (.svg) and then download the kit.
Upload Font Files to Snapps
If you already have the links to the fonts (for example, they are hosted on your font foundry and they provide you with the links or you uploaded the fonts to file sharing platform), skip to the next step. Otherwise, you will need to embed the generated .ttf, .svg and .eot versions of the font to your site.
- In the left panel, click Content, click Site Content, and then click Manage Files.
- Click Upload New File and upload these files.
- If you hover over one of the items in Uploaded Files, click Select to generate a Download File button on your site.
- On the navigation bar, click Info & Tools and then click Preview Link. Right-click the button and select Copy link address. This is the link to the file on your Snapps site. This process must be done separately for each file, so that in the end, you will have three links to three file formats.
- NOTE: This step does not work when previewing within the editor. You need to use the preview link accessible under Info & Tools on the navigation bar.
Embed Files on Snapps via @font-face
CSS Code Template
- Go to Developer Mode in your site, open the site.css file and paste the following code:
@font-face {
font-family: 'FONT-NAME';
src: url('URL') format('embedded-opentype'),
url('URL') format('svg#FONT-NAME'),
url('URL') format('truetype');
font-weight: normal;
font-style: normal;
}
Find Name For Your Custom Font
- Navigate to the folder you were provided with at your font foundry or downloaded from FontSquirrel and look for a stylesheet file with a code similar to the one above. The line beginning with font-family: will have the unique name assigned to your font.

Updating CSS Code With Your Custom Font Name and File Download Links
- Copy the name of the font and replace two instances of FONT-NAME in the code snippet above with your font name.
- Save and close Developer Mode.
- In the left panel, click Content, and then click Site Content.
- Click Manage Files, and click Select on the font file to add a button to the site.
- Click the button to open the Content editor, right-click the font URL, and select Copy Link Address.
- Go to Developer Mode, open site.css, and replace the URL with paths to the respective formats that you uploaded (the copied URL from the button in step 5) and click Save.
WARNING: Do not forget to change the closing signs: a semicolon at the end of the files list, and a comma after .svg format.

Return to the editor, right-click the text element you want to edit and click Edit HTML/CSS. You can then apply the new font to widgets in all devices, or in specific device views using the CSS snippet in the following form: font-family: 'FONT-NAME' !important;. For example, for our font, we added this CSS line of code: font-family: 'cry_wolfregular' !important;.
This way, you can apply the font to paragraphs, headings, and so on. If you would like to apply custom fonts to the text elements in the header, please do that in
Developer Mode.
Apply Font to Specific Global Site Fonts
To apply your custom fonts globally, you must replace the specific CSS elements with your custom font name. To do this:
- Click the Developer Mode button in navigation bar.
- Click Site HTML/CSS, and then click site-theme.css.
- Search for the specific heading or font class you want to change (for example, H1, H2, and so on), and replace the current font family with your custom font name.
- Click Save.
- Click Close to close developer mode.
Apply Font via CSS
To set the font you embedded as your site's global font, add the following CSS line to site.css. For more information on adding custom CSS, see
Developer Mode.
"*#dm div.dmContent *, *#dm div.dmFooter *, *#dm div.dm-title {YOUR_GOOGLE_INTEGRATION_CODE}"
Replace
YOUR_GOOGLE_INTEGRATION_CODE above with the font-family CSS code you copied from Google Fonts. Click
Save.
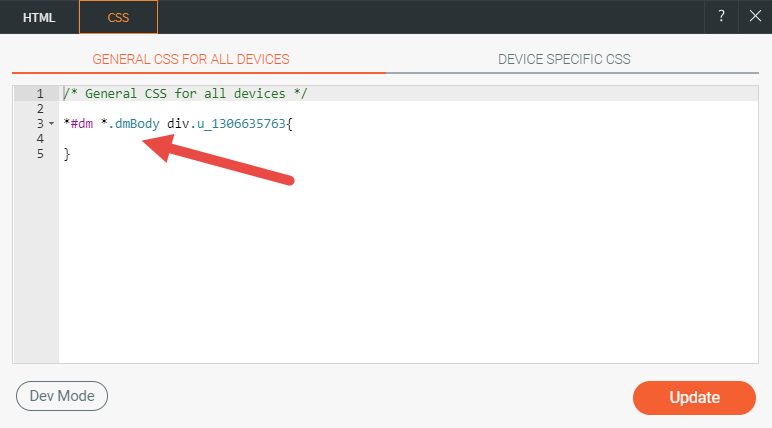
- Right-click the widget, and click Edit HTML/CSS to open the widget's HTML/CSS editing window.
- Add the font-family CSS code you saved in Step 2 above between the brackets { } under general or device specific CSS.
The font is now applied to the widget’s text elements and you can use the inline editor to change the colors and edit the text as normal.
Apply Font to Specific Global Site Fonts
To apply your custom fonts globally, you must replace the specific CSS elements with your custom font name. To do this:
- Click the Developer Mode button in navigation bar.
- Click Site HTML/CSS, and then click site-theme.css.
- Search for the specific heading or font class you want to change (for example, H1, H2, and so on), and replace the current font family with your custom font name.
- Click Save.
- Click Close to close developer mode.
Notes About Using Custom Fonts With Snapps
- Snapps does not support .woff2.
- Pay attention to the way glyphs are rendered in the web version of your font. Many custom fonts offer several version of glyphs. Please make sure your font renders correctly before applying it to the live site.
- Custom fonts may slow down site performance and loading time because the font must be downloaded before it is displayed. Snapps sites generally have very high page speed ranking, but a decrease in page loading speed is inevitable when additional fonts are loaded to the site. Be sure to consider whether the use of custom fonts justifies a decrease in page speed.
- In case the custom font does not render for various reasons, consider adding a fallback font in your CSS.
- With Snapps, you do not need to use @media queries to display fonts only on certain devices. Instead, you can simply add custom CSS per device.
- Only use fonts licensed for web embedding and/or commercial use. Not complying with a font owner’s license is a violation of their copyright.
back to Custom Code